Home > Flight Simulator Airline Crew Simulations > Aerosoft Airbus X Series > Button Control > Flows > Captain / Pilot Flying
Captain / Pilot Flying
Setting Up
- When flight simulator loads, the default aircraft should the Trike. NEVER used saved situation files. Save situation files can cause problems with complex 3rd party addons.
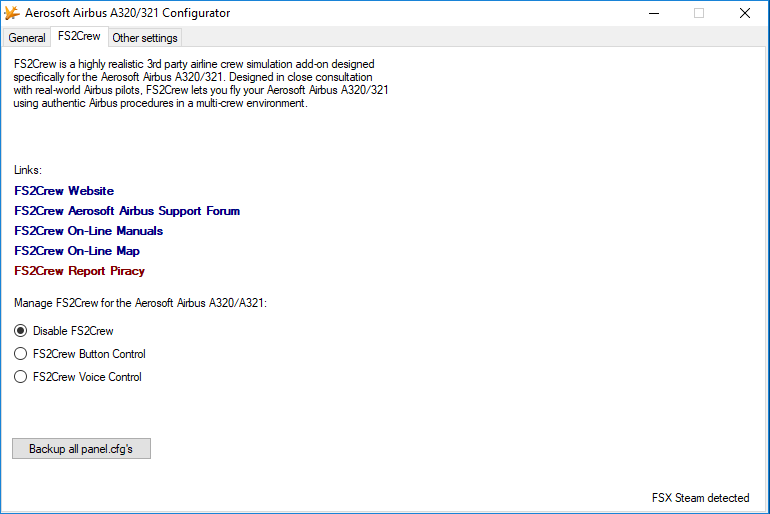
- Open the Aerosoft Airbus Configurator. Enable FS2Crew.
- Load the desired Airbus Panel State via the FO's MCDU, such as Cold and Dark. (Remember: If you load the Cold and Dark panel state, External Power will be connected to the aircraft automatically).
- Open the FS2Crew Main Panel by pressing the key you assigned to 'AUTOFEATHER (ARM/OFF)' in the FSX 'SETTINGS - CONTROLS' menu. IMPORTANT: ONLY OPEN THE FS2CREW MAIN PANEL AFTER YOU HAVE LOADED THE AIRBUS PANEL STATE!
- The "PANEL LOCK (LK)" button on the FS2Crew Main Panel will be on by default. It forces the FS2Crew Panels to stay open when views are switched. To unlock the FS2Crew panels, press the LK button.
- If running the Pre-Flight events routine (it's strictly optional), select the desired power source on the Config Panel (APU or EXT).
- Select any other settings on the Config Panel.
- Press the "RUN PF EVENTS" button on the Config Panel. (Remember: Only press this button if you want to run the Pre-Flight events section. It's OPTIONAL. If you want to save time, you can load any other Airbus Panel state, such as the 'Taxi' or 'Take-off' Panel State, and advance the FS2Crew Mode to the desired Mode using the arrow buttons on the FS2Crew Main Panel, and start from there).
- Depending on your settings and location, the outer doors will open and the jetway will connect to the aircraft.
The Aerosoft Airbus Configurator - FS2Crew Section
Preliminary Cockpit Prep, Cockpit Prep and Before Start Procedure
- Set the ADIRS to NAV.
- Elapsed Time (Reset if Necessary)
- Extinguish All White Lights (such as the Fuel Pumps).
- Exterior lights As Required (Nav and Logo Lights).
- Signs Set.
- Emergency Exit Light Armed.
- Pack Flow As Required.
- Setup MCDU <- THIS IS CRITICAL. THE MCDU MUST BE SETUP IN FULL FOR EACH FLIGHT AS FS2CREW TAKES A LOT OF REQUIRED DATA DIRECTLY OUT OF THE MCDU
- Baro Ref Set.
- LS As Required.
- FCU Set.
- ATC (Squawk Code) Set.
- Turn on Radios.
- Time Remaining + 18: The Agent will ask you if you are ready for boarding. Press the Secondary Button.
- When ready, run the takeoff briefing using the Brief panel.
- Time Remaining + 8: The Loadsheet will arrive. Press the Secondary Button..
- Time Remaining + 2: The outer doors will close.
- Time Remaining + 2: The ground crew will contact you. Reply: "GO AHEAD". The Ground crew will inform you that they are are removing the jetway/stairs.
- If external power is connected, command the Ground Crew to disconnect external power using the Secondary Button. Make sure you manually start the APU first!
- Time Remaining + 1: The FA will inform you the cabin is ready for pushback. Press the Secondary Button.
- Command: “BEFORE START PROCEDURES” just prior to pushback/engine start and after the doors have been closed.
Before Pushback
- Takeoff Data Enter/Revise.
- MCDU Page to PERF TO.
- Call "BEFORE START CHECKLIST TO THE LINE" and run the checklist.
BEFORE START CHECKLIST TO THE LINE
COCKPIT PREP
GEAR PINS AND COVERS
SIGNS
ADIRS
FUEL QUANTITY
TO DATA
BARO REF |
|
COMPLETED
REMOVED
ON/ AUTO
NAV
___KILOGRAMS / POUNDS/ TONS*
SET
___SET* |
- NW Steering Disc as Required
- Windows/Doors Check.
- Thrust Levers Idle.
- Park Brake Accu pressure Check.
- Parking Brake Set.
- Call "BEFORE START CHECKLIST BELOW THE LINE" and run the checklist (this is usually done after you've received clearance from ATC for engine start. If you're not using ATC software or VATSIM, just run this checklist when convenient prior to engine start).
BEFORE START CHECKLIST BELOW THE LINE
WINDOWS/DOORS
BEACON
THRUST LEVERS
PARKING BRAKE |
|
CLOSED
ON
IDLE
SET / RELEASED |
Pushback and Engine Start
(If Push Back Required)
- Call: "COCKPIT TO GROUND".
- Call: "WE ARE READY FOR PUSHBACK AND ENGINE START".
- Call: "BRAKES RELEASED".
- When instructed, call: "BRAKE SET".
- Call: "YOU ARE CLEARED TO DISCONNECT AND GO TO HAND SIGNALS". <- THIS COMMAND IS WHAT TRIGGERS THE MODE CHANGE TO 'A. START PROC'.
(If Not Pushing Back - Starting Engines at the Stand)
- Call: "COCKPIT TO GROUND".
- Call: "WE ARE READY FOR ENGINE START".
- Call: "YOU ARE CLEARED TO DISCONNECT AND GO TO HAND SIGNALS". <- THIS COMMAND IS WHAT TRIGGERS THE MODE CHANGE TO 'A. START PROC''.
Engine Start
- Obtain Engine Start Clearance As Required. The Start Crew will inform you when you can start the engines.
- PA Announcement: "CABIN CREW ARM SLIDES AND CROSS CHECK".
- NOTE: BASED ON AIRBUS SOPS, THE CAPTAIN -THAT'S YOU!- MANUALLY STARTS THE ENGINES, NOT THE FO!
- Engine Mode Selector to Ignition/Start.
- Engine 2 Start announce: "STARTING ENGINE TWO".
- Engine Master Switch 2 to On.
- Repeat the procedure for Engine 1.
After Start
- Call: "AFTER START PROCEDURE".
- Engine Mode Selector to Norm.
- APU Bleed Off.
- Engine Anti Ice As Required.
- Wing Anti Ice As Required...
- APU Master Switch As Required.
- Call "AFTER START CHECKLIST" and run the checklist.
AFTER START CHECKLIST
ANTI ICE
ECAM STATUS
PITCH TRIM
RUDDER TRIM |
|
OFF/ ENGINE ANTI ICE ON/ ENGINE AND WING ANTI ICE ON
CHECKED
____SET*
ZERO |
- Perform the Flight Control Check procedure (Note: Based on the Airbus manuals, the Flight Control Check would be done during taxi. But it's awkward to do in Flight Simulator while moving, so it's recommended you perform the Flight Control Check prior to taxi).
FLIGHT CONTROL CHECK PROCEDURE:
- Call: "FLIGHT CONTROLS CHECK". The FO will reply "READY".
- Push the control stick full up. The FO will speak "FULL UP".
- Push the control stick full down. The FO will speak "FULL DOWN".
- Center the control stick. The FO will speak: "NEUTRAL".
- Push the control stick full left. The FO will speak "FULL LEFT".
- Push the control stick full right. The FO will speak "FULL RIGHT".
- Center the control stick. The FO will speak: "NEUTRAL".
- Call: "RUDDER".
- Push the rudder full left. The FO will speak "FULL LEFT". Push the rudder full right. The FO will speak "FULL RIGHT". Center the rudder. The FO will speak: "NEUTRAL".
NOTE: Due to joystick calibration issues, you may need to use quite a bit of force in order to hit the rudder deflection trigger point.
Taxi
- Taxi Clearance Obtain.
- Nose Light to Taxi.
- Parking Brake Off.
- Call: "CLEAR ON THE LEFT".
- Start taxi.
- Brakes check. Call: "BRAKE CHECK". The FO will reply "READY". Gently press the brakes. The FO will only respond if there is a problem.
- In the Main Window, you will see the message: "WAIT FOR CABIN SECURE". So start taxiing to the runway, but do not try to call for the next Checklist until the FO tells you the cabin is secure.
Before Takeoff
- After the FO has informed you that the cabin is secure and after the FO has performed the Takeoff Config check, call: "BEFORE TAKEOFF CHECKLIST TO THE LINE" and run the checklist.
BEFORE TAKEOFF CHECKLIST TO THE LINE
FLIGHT CONTROLS
FLIGHT INSTRUMENTS
BRIEFING
FLAP SETTINGS
V1. VR. V2/FLX TMP
ATC
ECAM MEMO |
|
CHECKED
CHECKED
CONFIRMED
CONFIG 1 PLUS F / CONFIG 2/ CONFIG 3
____ *
SET
TAKEOFF NO BLUE |
- Call: "CABIN CREW SEATS FOR DEPARTURE"
- Stow Sliding Table.
- Speak: "BEFORE TAKEOFF CHECKLIST BELOW THE LINE" and run the checklist.
BEFORE TAKEOFF CHECKLIST BELOW THE LINE
CABIN CREW
TCAS
ENGINE MODE SELECTOR
PACKS |
|
ADVISED
TA or TA RA
NORMAL / NORM / IGNITION
OFF/ ON THE APU/ ON
|
Takeoff
- Call: "TAKEOFF".
- Release brakes.
- Chrono on.
- Thrust levers TOGA/FLEX.
- IMPORTANT: DO NOT ROTATE BEFORE THE FO CALLS 'ROTATE' OR THE MODE WILL NOT CHANGE TO INITIAL CLIMB!
Initial Climb
- Call: "GEAR UP" after the FO announces: "POSITIVE RATE".
- Retract the flaps on schedule: "FLAPS TWO / FLAPS ONE / FLAPS ZERO (or FLAPS UP if desired". (Note: The FO will perform a speed check for each flap setting. Ensure you are above the minimum flap retraction speed
After Takeoff
- When the flaps are up, call: "AFTER TAKEOFF CHECKLIST TO THE LINE" and run the checklist.
AFTER TAKEOFF CHECKLIST TO THE LINE
LANDING GEAR
FLAPS
PACKS |
|
UP
RETRACTED
ON |
Climb
- MCDU Page to Perf Climb.
PASSING THE TRANSITION LEVEL PROCEDURE:
- Set Baro Ref to Standard Pressure (PULL STD).
- Call "SET STANDARD".
- You will then perform an altimeter cross check.
- The FO will then say: "PASSING FLIGHT LEVEL XXXX...", where XXXX is a Flight Level higher than your current altitude.
- When the FO says "NOW" as the aircraft passes through that Flight Level.
- Announce: "AFTER TAKEOFF CHECKLIST BELOW THE LINE" and run the checklist.
AFTER TAKEOFF CHECKLIST BELOW THE LINE
Note: After the FO calls "NOW", the Secondary Window will display "APP BRIEF". This is a reminder to run the Approach Brief. You should run the Approach Brief well before reaching the Top of Descent point.
Cruise
- ECAM Memo/ SYS Pages Review.
- Fuel Monitor.
- Nav accuracy Check.
- Radar tilt Adjust.
- Cabin temp Monitor.
Note: There is no 'Cruise Mode', so when you are in cruise the FS2Crew mode will say "Approach". However, 'Descent Mode' is not activated internally until you run the Approach Brief or call for the Approach Checklist.
Descent Preparation
- Landing Elev Check.
- FMGS Prepare.
- Autobrake As Required.
- Run the approach briefing on the Brief Panel.
Descent
- Descent Initiate.
- MCDU Prog/Perf Descent.
AT 10,000 FEET:
- EFIS Option CSTR
- LS Pushbutton As Required.
WHEN CLEARED TO AN ALTITUDE:
- Set Baro Ref. Press the Secondary Button with the Secondary Window displaying "BARO SET". You will then perform an altimeter cross check.
- The FO will then say: "PASSING XXXX ALTITUDE...", where XXXX is an altitude lower than your current altitude.
- The FO will speak "NOW" when passing the spoken altitude.
Approach and Landing
- Call: "APPROACH CHECKLIST".
APPROACH CHECKLIST
BRIEFING
ECAM STATUS
SEAT BELTS
BARO REF
MDA/DH
ENGINE MODE SELECTOR |
|
CONFIRMED
CHECKED
ON
____ SET*
____ SET*
NORM/ NORMAL/ IGNITION
|
- Extend the flaps on schedule: "FLAPS 1 / FLAPS 2 / FLAPS 3 / FLAPS FULL". (Note: The FO will perform a speed check, so make sure you're below VFE for the desired flap. There's a placard on the main instrument panel that lists the VFE for each flap setting).
- When Flaps 2 call: "GEAR DOWN".
- Stow sliding table.
- Once the final landing flap has been selected, call: "LANDING CHECKLIST".
LANDING CHECKLIST
CABIN CREW
A/THR
ECAM MEMO |
|
ADVISED
SPEED/ OFF
LANDING NO BLUE |
- At the DH/MDA: "CONTINUE" or, if you need to go-around, "GO AROUND FLAPS".
- Announce: "LANDING" if landing.
Rollout
- Max Reverse.
- At 70 knots Reverse Idle.
- At taxi speed Reverse Stow.
- Before 20 knots, Autobrake Disengage.
After Landing
- Call:" OKAY TO CLEAN UP".
- Ground Spoilers Disarm.
- Chrono Off.
- Wx radar as required.
Parking
Note: Never forget to run the Parking Checklist if you intend to make a 2nd leg!!!
- During the taxi in, call: "AFTER LANDING CHECKLIST". The FO will read the checklist SILENTLY and then announce when the checklist is complete.
- Press the Secondary Button to ask the FO to turn off the nose light so you don't blind the crew ground.
- If you need external power and the APU is not running, ask the ground crew connect external power by pressing the Secondary Button while C.EXT PWR is in the Secondary Window. Note that you will have needed to set the power source to EXT on the FS2Crew Config Panel prior to landing for this option in the Secondary Window to be visible.
- Accu Press Check.
- Parking Brake On.
- Engine Master 1 and 2 Off.
- Beacon light Off.
- Other Exterior lights Off.
- Seat Belts Off.
- DU's dim.
- The Ground Engineer will contact the cockpit to inform you that the chocks are in. When you hear: "GROUND TO COCKPIT", call: "GO AHEAD" to reply to the engineer.
- After talking to the engineer, make PA Announcement via the PA Panel. Call: "CABIN CREW DISARM SLIDES".
- The FA will phone the cockpit a few moments after you make the 'Disarm Slides' PA. You will hear a single "Chime" sound. Press the FA Button on the Main Panel to answer the phone.
- Call: "PARKING CHECKLIST" and run the checklist.
PARKING CHECKLIST CHECKLIST
APU BLEED
ENGINES
SEAT BELTS
EXTERIOR LIGHTS
FUEL PUMPS
PARKING BRAKE and CHOCKS |
|
ON
OFF
OFF
OFF/ SET
OFF
RELEASED / SET |
Securing the Aircraft
- Parking Brake Check On.
- ADIRS 1, 2,3 Off.
- Call: "SECURING THE AIRCRAFT CHECKLIST" and run the checklist.
SECURING THE AIRCRAFT CHECKLIST
ADIRS
OXYGEN
APU BLEED
EMERGENCY EXIT LIGHT
NO SMOKING
APU AND BATTERY |
|
OFF
OFF
OFF
OFF
OFF
OFF |