Using External Air/ Power
Option #1: Start Both Engines at the DEPARTURE GATE Prior to Pushback:
- Ensure parking brake is on.
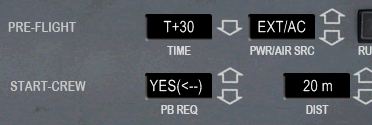
- In the ‘PB REQ’ box select the <-- option as shown in the figure below.
- The <-- indicates that you will start both engines prior to pushback.
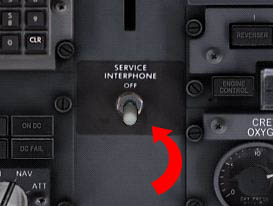
- Ensure the Service Interphone switch on the Aft Overhead is selected to 'On'.
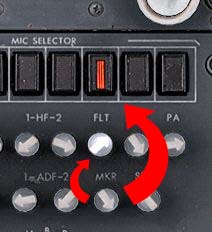
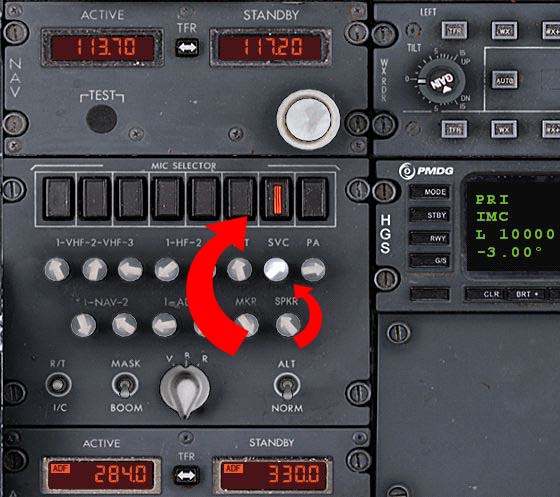
- Ensure the SVC button on the audio control panel is selected to on as shown above. (Note, you also simply press in the FLT mic button instead).
- After you've completed the 'Before Start Checklist' and with the mode in: "S.CREW / ENG START", speak: “WE ARE READY FOR AN EXTERNAL AIR ENGINE START”.
- Instruct the FO to start number #1. Speak: “START ENGINE ONE”.
- After starting engine #1 (the left engine), manually connect the left engine generator to the bus and switch the Ground Power Switch on the overhead to ‘off’.
- Next, instruct the ground crew to disconnect external air and the GPU. Speak: “YOU CAN DISCONNECT THE EXTERNAL AIR AND GPU NOW”.
- Be sure to do Step 9 ONLY AFTER you have manually connected Engine Generator 1 to the bus or you will lose power!
- The ground crew will clear you to Start #2 when he informs you that the external air and power have been removed.
- Set the parking brake if it's not already set, otherwise the aircraft may start to taxi when you advance the left throttle as per Step 9.
- To start Engine #2, advanced the left throttle until bleed duct pressure indicates about 30 PSI, then speak: “START ENGINE TWO CROSS BLEED START”.
- Next, after both engines have started, call for pushback. Speak: “WE ARE READY FOR PUSHBACK”.
- Complete a normal pushback sequence.
Option #2: Start Left Engine at DEPARTURE GATE and Right Engine at end of Pushback:
- Ensure parking brake is on.
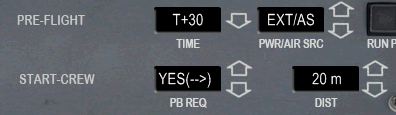
- In the ‘PB REQ’ box select the --> option as shown in the figure below.
- The --> indicates that you will start the left engine prior to pushback and the right engine at the end of the pushback.
- Ensure the Service Interphone switch on the Aft Overhead is selected to 'On'.
- Ensure the SVC button on the audio control panel is selected to on as shown above. (Note, you also simply press in the FLT mic button instead).
- After you've completed the 'Before Start Checklist' and with the mode in: "S.CREW / ENG START", speak: “WE ARE READY FOR AN EXTERNAL AIR ENGINE START”.
- Instruct the FO to start number #1. Speak: “START ENGINE ONE”.
- After starting engine #1 (the left engine), manually connect the left engine generator to the bus and switch the Ground Power Switch on the overhead to ‘off’.
- Next, instruct the ground crew to disconnect external air and the GPU. Speak: “YOU CAN DISCONNECT THE EXTERNAL AIR AND GPU NOW”.
- Be sure to do Step 9 ONLY AFTER you have manually connected Engine Generator 1 to the bus or you will lose power!
- Wait for the ground crew to tell you that the external power and air have been removed.
- Next, call for pushback. Speak: “WE ARE READY FOR PUSHBACK”.
- Start Engine 2 when cleared by the ground crew. The ground crew will clear you to start Engine 2 near the end of the pushback sequence.
- To start Engine #2, advanced the left throttle until bleed duct pressure indicates about 30 PSI, then speak: “START ENGINE TWO”.
Option #3: Using the GPU for power at the DEPARTURE GATE and the APU for air:
You have the option of using the GPU to provide power and the APU to provide air conditioning.
To do that, please do the following:
- Configure the Captain's Audio Control Panel so you can talk to the ground crew.
- At some point prior to calling for the BEFORE START PROCEDURE, manually put the APU on the busses so the APU is powering the aircraft. If you don't do that, the aircraft will lose power when the ground crew disconnects the GPU!
- Next, speak: “COCKPIT TO GROUND”. The engineer will reply.
- Next, speak: “PLEASE DISCONNECT EXTERNAL POWER”.
Using the GPU and External Air at the ARRIVAL Gate:
Many airports do not want you use to the APU. In those cases, you need to connect the GPU at the arrival gate.
To do that, please do the following:
- Prior to landing, select EXT in the PWR/AIR SRC box as shown in the figure below, and choose the air source to be used: Air Start Cart (AS) or Air Conditioning (AC).
- During his after landing flow, the FO will NOT turn on the APU.
- When you arrive at the gate, set the parking brake and shutdown only Engine #2 (the right engine).
- Ensure the Service Interphone switch on the Aft Overhead is selected to 'On'.
- Ensure the SVC button on the audio control panel is selected to on as shown above. (Note, you also simply press in the FLT mic button instead).
- Next speak: “COCKPIT TO GROUND”. The engineer will reply.
- Next speak: “PLEASE CONNECT THE GPU AND EXTERNAL AIR NOW”.
- The engineer will then connect the GPU and External Air.
- The FO should turn on the Ground Power switch.
- The engineer will then clear you to shut down Engine #1 (the left engine).
- Important: So you don't suddenly find yourself without power, visually confirm that the GPU is in fact connected to the aircraft and that it is powering the aircraft before shutting down engine #1!
- After both engines have been shutdown, the FO will commence his shutdown flow.
Using the GPU and APU at the ARRIVAL Gate:
You have the option of using the GPU to provide power and the APU to provide air conditioning.
To do that, please do the following:
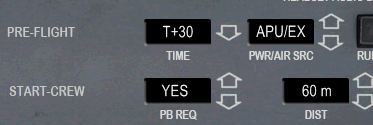
- Prior to landing, select APU/EX in the PWR/AIR SRC box as shown in the figure below
- During his after landing flow, the FO will turn on the APU.
- When you arrive at the gate, set the parking brake and shutdown only Engine #2 (the right engine).
- Ensure the Service Interphone switch on the Aft Overhead is selected to 'On'.
- Ensure the SVC button on the audio control panel is selected to on as shown above. (Note, you also simply press in the FLT mic button instead).
- Next speak: “COCKPIT TO GROUND”. The engineer will reply.
- Next speak: “PLEASE CONNECT THE GPU NOW”.
- The engineer will then connect the GPU approximately 30 seconds later, and clear you to shutdown Engine #1 (the left engine).
- The FO should turn on the Ground Power switch to connect the GPU to busses.
- Important: So you don't suddenly find yourself without power, visually confirm that the GPU is in fact connected to the aircraft and that it is powering the aircraft before shutting down engine #1!
- After both engines have been shutdown, the FO will commence his shutdown flow.